• Welcome to the Chevereto user community!

    Here users from all over the world gather around to learn the latest about Chevereto and contribute with ideas to improve the software.

    Please keep in mind:

    • 😌 This community is user driven. Be polite with other users.
    • 👉 Is required to purchase a Chevereto license to participate in this community (doesn't apply to Pre-sales).
    • 💸 Purchase a Pro Subscription to get access to active software support and faster ticket response times.

V4 Custom Page Guide

mkucuksari

Chevereto Member
As we all know that V3 custom pages do not work properly at V4. If you upgrade from V3, you need some guides. After a clean install V4 and take detail look at its custom page, I figure out how to make our own custom pages. I am not a expert. I jsut want to share what I have found up to now :)

1- First Chevereto V4 doesn't enable PHP pages by default. We need to toggle it, here the docs: https://v4-docs.chevereto.com/application/configuration/environment.html#toggles .
In order to do, we need to add this line at our "env.php" file that can be found in "/app" folder.

Code:
'CHEVERETO_ENABLE_PHP_PAGES' => '1',

2- Now, we can start to add our custom pages.

a- Lets add our first custom page as "Privacy Policy"
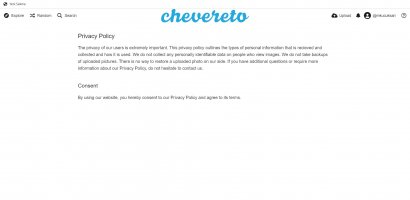
Privacy.jpg

Step-1: Login to your admin dashboard -> settings -> pages

Step-2: Click on "Add page" -> fill the necessary fields;
Title: "Privacy Policy" Page status: "Active page"Type: "Internal" Internal Page Type: "Extra Page" Page visibility: "Visible page" URL key: "privacy" File path: "privacy.php"
Link icon: "fas fa-lock"

Step-3: Source code: Copy and paste this code. You can change its content according to your need.

Code:
<?php
use function Chevereto\Legacy\G\include_theme_footer;
use function Chevereto\Legacy\G\include_theme_header;

// @phpstan-ignore-next-line
if (!defined('ACCESS') || !ACCESS) {
    die('This file cannot be directly accessed.');
} ?>
<?php include_theme_header(); ?>

<div class="content-width">
    <div class="c24 center-box margin-top-40 margin-bottom-40">
        <div class="header default-margin-bottom">
            <h1>Privacy Policy</h1>
        </div>
        <div class="text-content">
         
            <p>The privacy of our users is extremely important. This privacy policy outlines the types of personal information that is recieved and collected and how it is used.
            We do not collect any personally identifiable data on people who view images.
            We do not take backups of uploaded pictures. There is no way to restore a uploaded photo on our side.
            If you have additional questions or require more information about our Privacy Policy, do not hesitate to contact us.</p>

            <h2>Consent</h2>
            <p>By using our website, you hereby consent to our Privacy Policy and agree to its terms.</p>
         
        </div>
    </div>
</div>

<?php include_theme_footer(); ?>
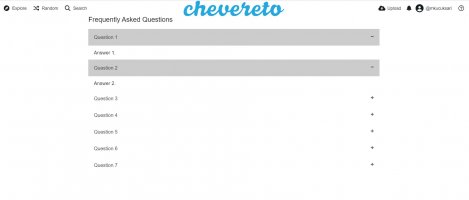
 
b- Lets add our 2nd custom page as "FAQ".

This FAQ guide is shared by @tomsit at this thread. I know adapted it to V4. So all crediats goes to him.
https://chevereto.com/community/threads/guide-simple-faq-page-with-accordion.9379/

FAQ.jpg

Step-1: Login to your admin dashboard -> settings -> pages

Step-2: Click on "Add page" -> fill the necessary fields;
Title: "FAQ" Page status: "Active page" Type: "Internal" Internal Page Type: "Extra Page" Page visibility: "Visible page" URL key: "faq" File path: "faq.php"
Link icon: "fas fa-eye"

Step-3: Source code: Copy and paste this code. You can change its content according to your need.

Code:
<?php
use function Chevereto\Legacy\G\include_theme_footer;
use function Chevereto\Legacy\G\include_theme_header;

// @phpstan-ignore-next-line
if (!defined('ACCESS') || !ACCESS) {
    die('This file cannot be directly accessed.');
} ?>
<?php include_theme_header(); ?>

<div class="content-width">
    <div class="c24 center-box">
        <div class="header default-margin-bottom">
            <h1>Frequently Asked Questions</h1>
        </div>
        <div class="text-content">

            <button class="accordion">Question 1</button>
            <div class="panel">
              <p>Answer 1.</p>
            </div>

            <button class="accordion">Question 2</button>
            <div class="panel">
              <p>Answer 2.</p>
            </div>
            <button class="accordion">Question 3</button>
            <div class="panel">
              <p>Answer 3.</p>
            </div>

            <button class="accordion">Question 4</button>
            <div class="panel">
              <p>Answer 4.</p>
            </div>
            <button class="accordion">Question 5</button>
            <div class="panel">
              <p>Answer 5.</p>
            </div>

            <button class="accordion">Question 6</button>
            <div class="panel">
              <p>Answer 6.</p>
            </div>

            <button class="accordion">Question 7</button>
            <div class="panel">
              <p>Answer 7.</p>
            </div>
 
        </div>
    </div>
</div>

<script>
var acc = document.getElementsByClassName("accordion");
var i;

for (i = 0; i < acc.length; i++) {
  acc[i].onclick = function() {
    this.classList.toggle("active");
    var panel = this.nextElementSibling;
    if (panel.style.maxHeight){
      panel.style.maxHeight = null;
    } else {
      panel.style.maxHeight = panel.scrollHeight + "px";
    }
  }
}
</script>

<?php include_theme_footer(); ?>


Step-4: Custom CSS via dashboard -> settings -> theme, scroll down to the "Custom CSS" box and insert this code:

Code:
/* Style the buttons that are used to open and close the accordion panel */
button.accordion {
    font-family: 'Open Sans','Helvetica Neue',Helvetica,Arial,sans-serif;
    font-size: 1em;
    font-weight: 500;
    background-color: #ffffff; /* WHITE Question buttons, change this if needed */
    color: #444;
    cursor: pointer;
    padding: 18px;
    width: 100%;
    text-align: left;
    border: none;
    outline: none;
    transition: 0.4s;
}

/* Add a background color to the button if it is clicked on (add the .active class with JS), and when you move the mouse over it (hover) */
button.accordion.active, button.accordion:hover {
    background-color: #ccc;
}

/* Style the accordion panel. Note: hidden by default */
div.panel {
    padding: 0 18px;
    background-color: white;
    max-height: 0;
    overflow: hidden;
    transition: max-height 0.2s ease-out;
}
button.accordion:after {
    content: '\02795'; /* Unicode character for "plus" sign (+) */
    font-size: 8px;
    color: #777;
    float: right;
    margin-left: 5px;
}

button.accordion.active:after {
    content: "\2796"; /* Unicode character for "minus" sign (-) */
}
 
Back
Top